Website maintenance with git, the pro way
Posted by David Zaslavsky on — CommentsSince the beginning of version control, people have been using VCSs to manage websites. It works pretty well, because the process of web development is similar to the process of programming. Heck, with the advent of dynamic websites these days, often half of web development is programming. But web developers have one peculiar requirement that most other programmers do not: they have to maintain one particular copy of the site which gets continuously updated, but not always with the latest changes.
Typically, when you set up a version control system to handle your website, it works like this: you have a working copy on your computer, a repository on your server, and another “live” working copy on the web server which is the actual website content. Whenever you want to update the website, you push (or commit) changes from your computer to the repository, and have a hook script set up that makes the VCS update the live working copy with the latest changes. That’s the approach I found described in a couple of websites: http://danielmiessler.com/blog/using-git-to-maintain-your-website and http://toroid.org/ams/git-website-howto.

But once your site turns into a moderately complicated system, this doesn’t work so well. Professional websites that need to be reliably available usually have a staging server where the webmaster can test out a new version before changing the live site. And there may be a team of developers who all contribute to creating the website — or even if there’s only one webmaster, he or she might be using multiple computers.
For instance, I usually work on this website on my desktop at home, but I also have a couple of laptops that I can use to edit the site when I’m traveling. When I want to put up a new version, I first collect all the changes on my desktop and test them there, then copy them to a staging server (actually a virtual machine that runs on my home computer), which I’ve set up as a copy of my real web server so that I can test changes to the site before they go live. If they work there, I copy them to the web server itself. As you might guess, it’s not exactly straightforward to automate that process with git.
It is possible, though. The key to making this work is that git can push changes anywhere, not just to a central repository. So I could configure git on my desktop to update the staging server, and configure it on the staging server to update the live server.
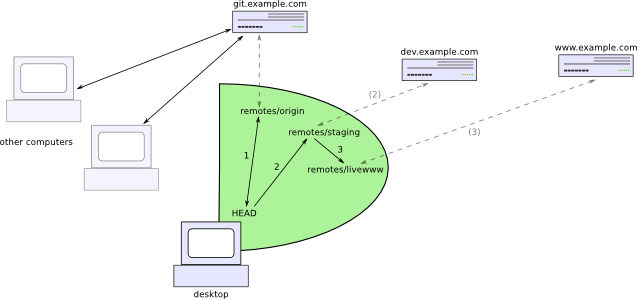
But wait, it gets better! Each clone of a git repository can be set up to automatically track the contents of other clones by adding them as remotes. So I can add the staging server and the live web server as remotes in my desktop repository, and I get to control the entire process from my desktop! Since the desktop repository keeps track of what the most current revision is on both the staging and live servers, I can tell it to copy “staging” to “live” without ever having to log in to the staging server.
Preparation
Without further ado, here’s how to set it up. Say you have a staging server at dev.example.com and a live web server at www.example.com. On both servers, you want the directory /srv/www to contain your website. (The git metadata directory would then be /srv/www/.git) Let’s also say that you have a server git.example.com which contains your central git repositories, and the one for your website is in /srv/git/website.git. You might set this up with gitosis, for example.
You should be able to connect to each of these servers over SSH, preferably using public-key authentication (so that you don’t have to type a password).
The first step is to make sure that you have a clone of the website repository on each computer: one on your development computer (like my desktop), one on your staging server, and one on your live server. Optionally you can have a bare clone on your git server. The way you set up these clones depends on your current situation, and there’s no way I can cover all the possibilities here. Just as an example, if you made the transition from Subversion to git, you might have a bare git repository on the git server git.example.com, with a clone of it on your home computer, where you do your work. In that case, to get started, you’d just clone the bare repository to your staging server and your web server (note that you may have to temporarily take your main site offline while you do this).
home$ ssh dev.example.com
dev$ git clone ssh://git.example.com/srv/git/website.git /srv/www
dev$ exit
home$ ssh www.example.com
www$ mv /srv/www /srv/www-backup
www$ git clone ssh://git.example.com/srv/git/website.git /srv/www
www$ exit
(In each line the part before the $ tells you which computer to run the command on, and the part after it is the actual command to run — fairly standard.)
The website can go back up now. If you made a backup copy of your web directory using the mv command above, don’t forget to come back and delete it later, once you’re convinced that everything is working.
The Procedure
Anyway, let’s say that however you did it, you’ve gotten those three clones of the same git repository set up. Back on your home computer, you first need to configure git to track the staging server and live server as remotes. It’s quickest to do this by editing the .git/config file with your favorite text editor. Add the following contents at the bottom of the file:
[remote "staging"]
        url = ssh://dev.example.com/srv/www
        fetch = +refs/heads/master:refs/remotes/staging/master
        pushurl = ssh://dev.example.com/srv/www
        push = refs/heads/master:refs/heads/master
[remote "livewww"]
        url = ssh://www.example.com/srv/www
        fetch = +refs/heads/master:refs/remotes/livewww/master
        pushurl = ssh://www.example.com/srv/www
        push = refs/remotes/staging/master:refs/heads/master
Now stop and do not run any git commands (!) until I explain what’s going on. These lines add the staging and live servers as remotes to the home git repository. You’ll recognize the URLs of the two servers, of course. The line fetch = +refs/heads/master:refs/remotes/staging/master tells git that when it pulls changes from the staging server, it should copy them from the remote branch master to the local branch master, but leave other branches alone.
The interesting part is the push configuration. For the staging remote, it’s refs/heads/master:refs/heads/master, which tells git to copy commits directly from the master branch on your home computer to the master branch on the staging server. The absence of the leading + tells git to perform fast-forward updates only; in other words, if there are any commits on the staging server which aren’t in your home repository, the push will fail (evidently somebody’s been playing around with the staging server behind your back). And for the live remote, refs/remotes/staging/master:refs/heads/master tells git to copy from the master branch on the staging remote to the master branch on the live server. Essentially, this takes the commits from your home computer’s record of what the staging server contains, and sends them off to the actual live server. Again, the + is absent, which means that if there’s anything on the live server that wasn’t already on the staging server, git will fail. This is a good thing because you want every piece of your site to go through the staging server first.
Anyway, now back to running git commands. The way we’ve configured the home repository, pushes to either server go into the master branch, which is the same one that’s going to be checked out. Git normally complains about this. You can configure it not to do this by setting the configuration property receive.denycurrentbranch to ignore:
home$ ssh dev.example.com
dev$ cd /srv/www
dev$ git config receive.denycurrentbranch ignore
Git still won’t automatically update the checked-out copy of the files, though. When it receives a push, it only changes its repository, in the .git directory. To actually update the files checked out on the filesystem, we need to create a hook script.
dev$ echo 'git --work-tree=.. checkout -f' >>.git/hooks/post-receive
dev$ chmod a+x .git/hooks/post-receive
Finally, delete the origin remote, because you don’t want this repository to be able to automatically receive changes from anywhere except your home computer.
dev$ git remote rm origin
dev$ exit
You need to do the same thing for the live web server:
home$ ssh www.example.com
www$ cd /srv/www
www$ git config receive.denycurrentbranch ignore
www$ echo 'git --work-tree=.. checkout -f' >>.git/hooks/post-receive
www$ chmod a+x .git/hooks/post-receive
www$ git remote rm origin
www$ exit
Now try pushing changes for the first time:
home$ git push staging
Everything up-to-date
home$ git push livewww
Everything up-to-date
If you get an error instead of the message about everything being up to date, something’s wrong with your configuration. Otherwise, you’re all set! Try making a change to the site and pushing it out.
Every time you want to update the staging server with the latest changes, you run
home$ git push staging
and once you’ve tested those changes on the staging server and want to push them out to the live web server, run
home$ git push livewww
Variations
Depending on your needs, you might want to adjust this procedure a bit. Let’s say you only want to push changes to the staging server from the bare repository on git.example.com, not from your home computer directly. You can do this by altering the remote.staging.push configuration option to read refs/remotes/origin/master:refs/heads/master instead of refs/heads/master:refs/heads/master. This might be useful if you have multiple developers who need to be able to push to the staging server.
Another common thing to want to do is reload the server each time the site is changed. You can do this in the hook script, just add the command to reload the server. For Apache, you can run
dev$ echo 'git --work-tree=.. checkout -f' >>.git/hooks/post-receive
dev$ echo 'sudo /etc/init.d/apache2 reload' >>.git/hooks/post-receive
after the echo 'git --work-tree=.. checkout... line. Or open .git/hooks/post-receive yourself and add the line with your favorite text editor. You’ll need to make sure that sudo can run the reload command without a password, because you won’t be able to enter one. (Although that could be arranged if you really needed it)
It may be the case that the server only needs to be reloaded when certain files change; for example, I use a line like this
awk '{system("git diff " $1 ".." $2 " --name-only")}' | egrep '.py$' >/dev/null && sudo /etc/init.d/apache2 reload
to reload Apache only when a Python file (whose name ends in .py) has changed.